How do you create your first Leadpages landing page from start to finish?
This guide follows the real order of a first landing page: plan the offer, build the page with AI, review it, publish it on your domain, then collect and track leads. Plan on half a day, during the 7-day free trial.
The essentials in 30 seconds
- Plan your offer before you start
- Pick a plan and start the trial
- Open the Create screen
- Describe your page in detail
- Choose images and style
- Fix the page by chatting
- Check the form and consent
- Check the mobile view
- Set the address and SEO
- Publish on your own domain
- Send leads to your email tool
- Run a full test yourself
- Bring in your first visitors
- Track your results
- Improve the page with an A/B test
Avoid: Putting several goals on the same page (sign up, buy, follow on Instagram): the visitor hesitates and does nothing.
See the details with screenshots ↓Step by step
Screenshots show the interface used in the original guide (Shopify in French, Leadpages in English). In your account, buttons appear in your language.
- 1
Plan your offer before you start
A landing page has one goal. Decide it before you open the tool: collect emails, sell a product, book calls.
Write down: who the page is for, the problem you solve, what the visitor gets, and the one action you want them to take (for example « Get the free guide »).
Gather your logo, 2 or 3 photos, your colors and, if you have them, a few real customer reviews. You'll save time and AI credits.
Finally, plan the page layout. The one that works best for a first page fits in six blocks, in this order: a headline that states the result, a line that says who it's for, three concrete benefits, proof (a review, a real number, a client logo), the form or button, then two or three FAQs to clear the last doubts.
For the headline, start from the result the visitor wants, not your product. « Get 10 dinner ideas ready in 20 minutes » says more than « Discover my cookbook ». Write three versions and keep the clearest: you can test the others later.
- 2
Pick a plan and start the trial
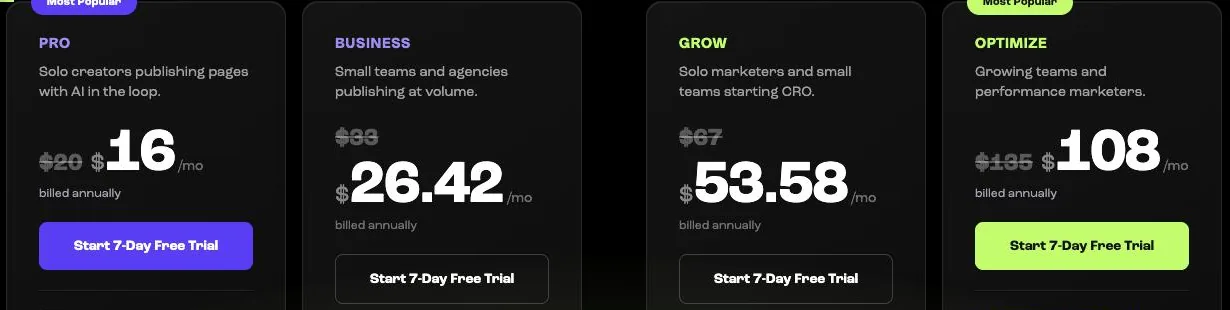
The pricing page has two families of plans. HTML Pub is for publishing pages, sites and blogs. Leadpages adds tools to improve results: A/B testing from the Grow plan, then Smart Traffic and heatmaps from Optimize.
For a first page, HTML Pub is often enough. If you want to test two versions of your page, choose Leadpages Grow.
Click « Start 7-Day Free Trial ». A credit card is required, but nothing is charged before day 7. Put the end date in your calendar. Prices change often: check today's on the official page.
- 3
Open the Create screen
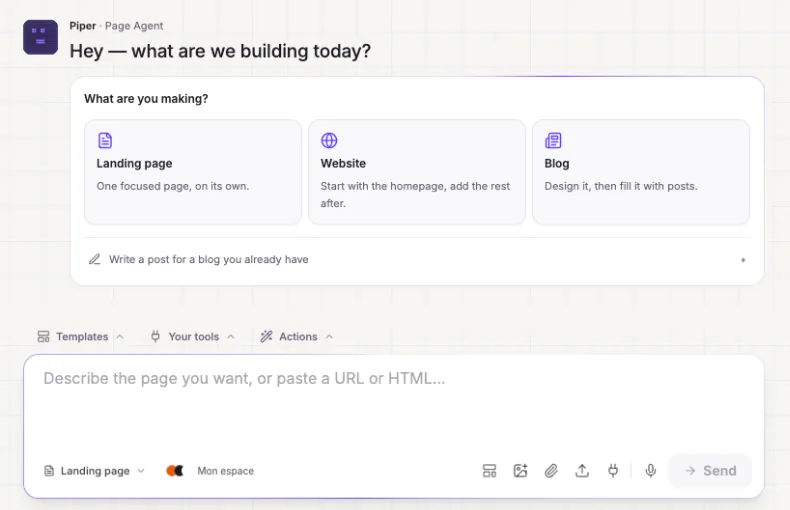
In the left menu, click « Create ». The AI assistant, Piper, asks « What are you making? »: choose « Landing page ».
Prefer to start from something ready-made? Click « Templates » to pick one, then « Use ». The rest of the guide stays the same.
- 4
Describe your page in detail
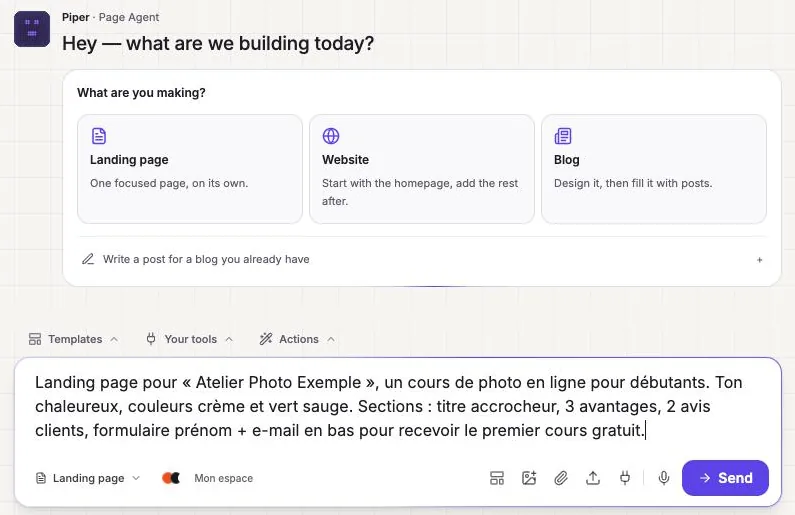
In the field at the bottom, use your notes from step 1: the audience, the offer, the tone, the colors and the sections you want. For example: a headline, three benefits, a customer review, an FAQ and a form with a single email field.
The more precise the description, the fewer credits you'll spend on fixes. Click « Send ».
Example of a complete description: « Landing page in English for a free PDF guide for independent fitness coaches who want to find their first clients online. Simple, motivating tone. Colors: navy and orange. Sections: headline with the promised result, three benefits, a short author bio, two FAQs, a form with a single email field and an unchecked consent box. Button: Get the guide. »
You can also paste the address of an existing page or some HTML: Piper uses it as a starting point.
- 5
Choose images and style
Piper asks which images to use: yours, AI-generated images (which cost more credits) or none for now. The estimated cost is shown at the top right.
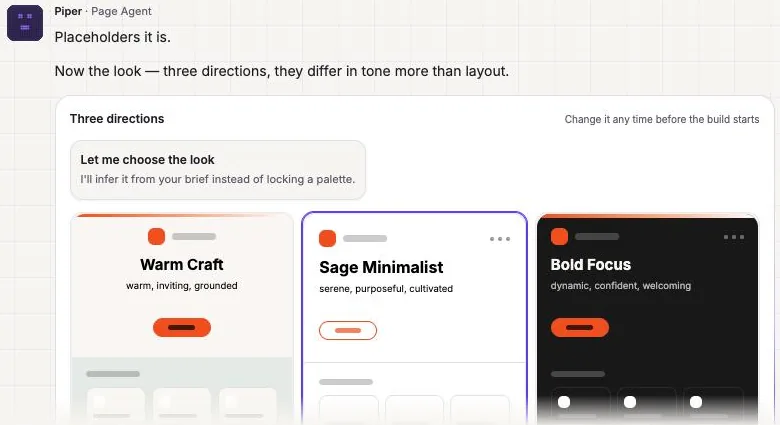
It then suggests three visual directions. Click the one you like, then « Build it ». The page is built in about a minute.
- 6
Fix the page by chatting
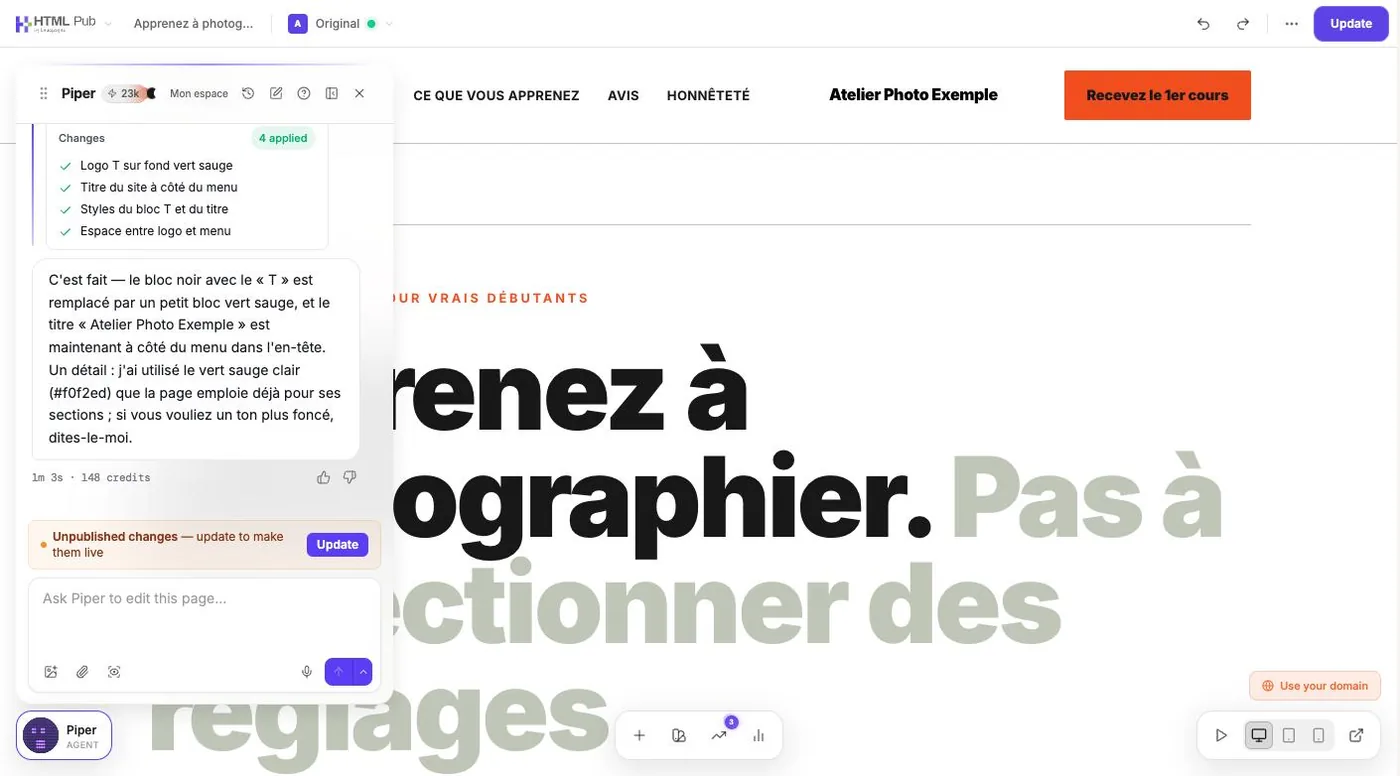
Click « Open in editor ». In the « Ask Piper to edit this page… » field, ask for one change at a time: « Replace the headline with… », « Make the button green », « Remove the pricing section ».
Piper lists what it changed and the credits used. Reread every piece of text yourself: AI can make up numbers or reviews. Replace them with real ones, or delete them.
A few useful requests for a first page: « Shorten every paragraph to two sentences max », « Add the button at the top of the page too », « Put my logo at the top left » (after uploading it in « Assets »), « Use my Brand Kit colors ».
For a small text change, clicking directly in the page is often faster than going through AI. Keep Piper for layout or style changes.
- 7
Check the form and consent
The form is the heart of the page. Ask for as little as possible: often, the email alone is enough.
If you plan to send marketing emails, add a checkbox that isn't pre-checked and a sentence explaining what the address will be used for and how to unsubscribe.
Finally, check the button text: it should say what the person gets (« Get the guide »), not just « Submit ».
Think about what happens after submitting: a thank-you message that says what to do next (« Check your inbox, the guide arrives in 2 minutes »), or a dedicated thank-you page. It's the right place to offer the next step, like a link to your store or your booking page.
If you promise a file (PDF guide, checklist, template), prepare it now and send it in the welcome email of your email tool (step 11).
- 8
Check the mobile view
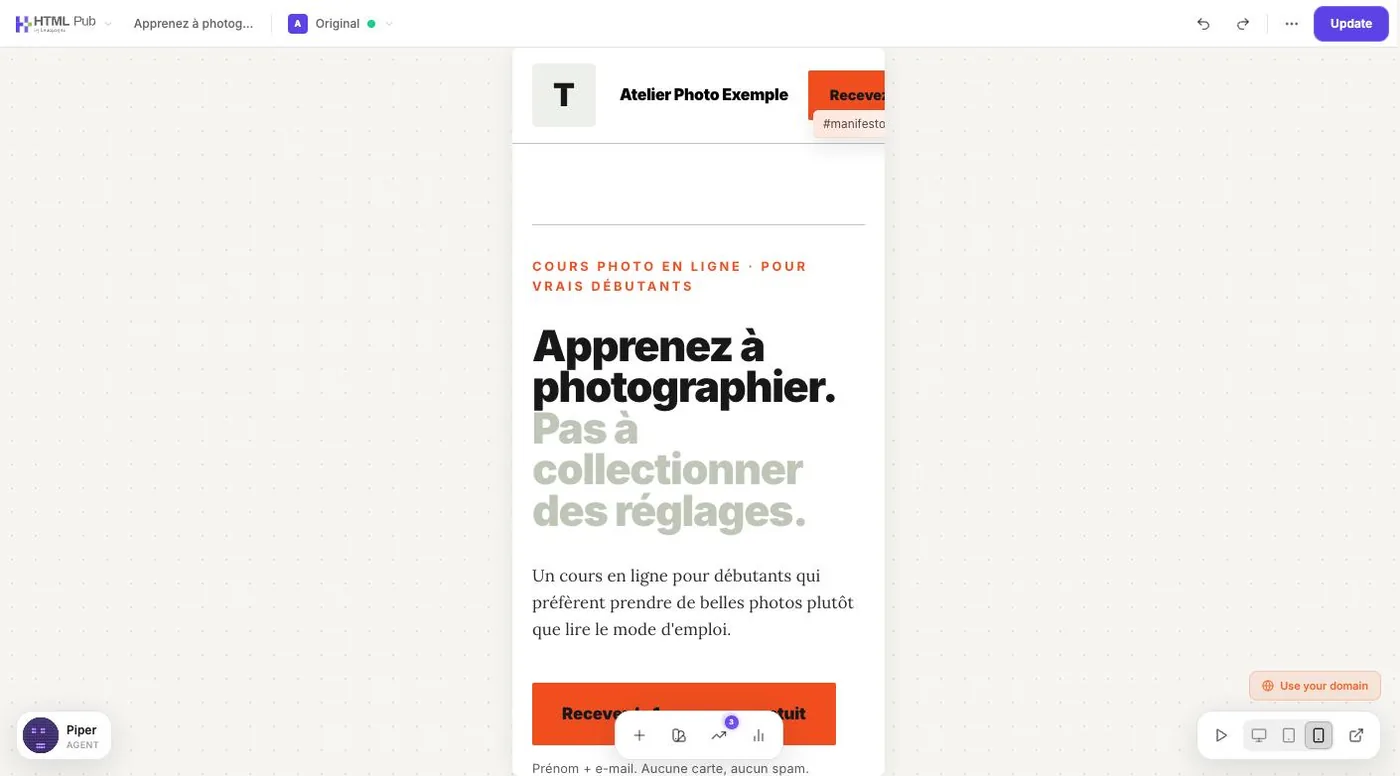
Most visitors arrive on their phone. At the bottom right of the editor, click the mobile icon. Check that the headline reads without zooming, the button is visible without scrolling too far, and the form is easy to fill in with a thumb.
Check speed too: heavy images slow the page down on a mobile network, and every second of waiting makes visitors leave. Use reasonably sized photos and avoid autoplay videos at the top of the page.
Finally, read everything out loud one last time. Typos and sentences that run too long are much easier to spot that way.
- 9
Set the address and SEO
In the editor, the « … » menu at the top right shows the page address (the slug). Keep it short and readable, for example free-guide.
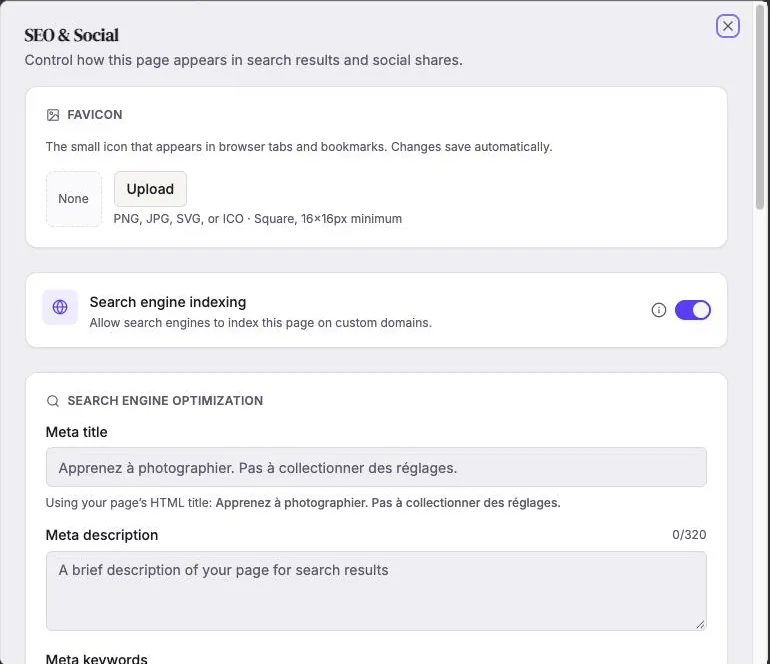
In « SEO & Social », set the title and description shown on Google and when the page is shared, plus the tab icon. If the page is only for an ad, you can ask Google not to index it.
- 10
Publish on your own domain
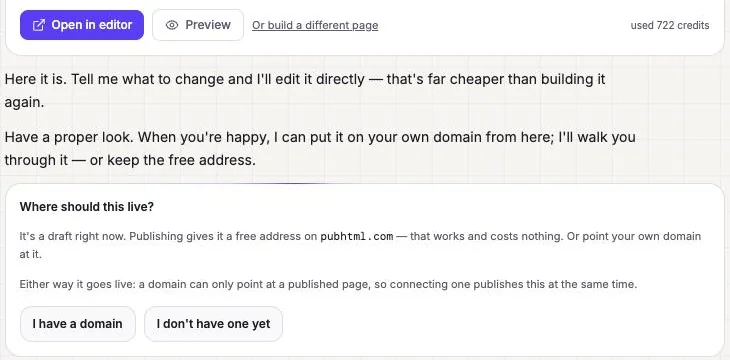
When you publish, the question « Where should this live? » appears. You can keep the free address provided, or connect your domain to look more trustworthy.
To connect a domain, open « Domains » in the left menu, then « Connect Domain ». A subdomain like offer.mysite.com is the simplest. Automatic setup configures the domain for you. HTTPS is free and can take up to 48 hours.
If automatic setup isn't available with your domain provider, add the records Leadpages shows by hand: a CNAME for the subdomain and a TXT for security. Copy the exact values from your account.
After each change, click « Update » to put the page live.
- 11
Send leads to your email tool
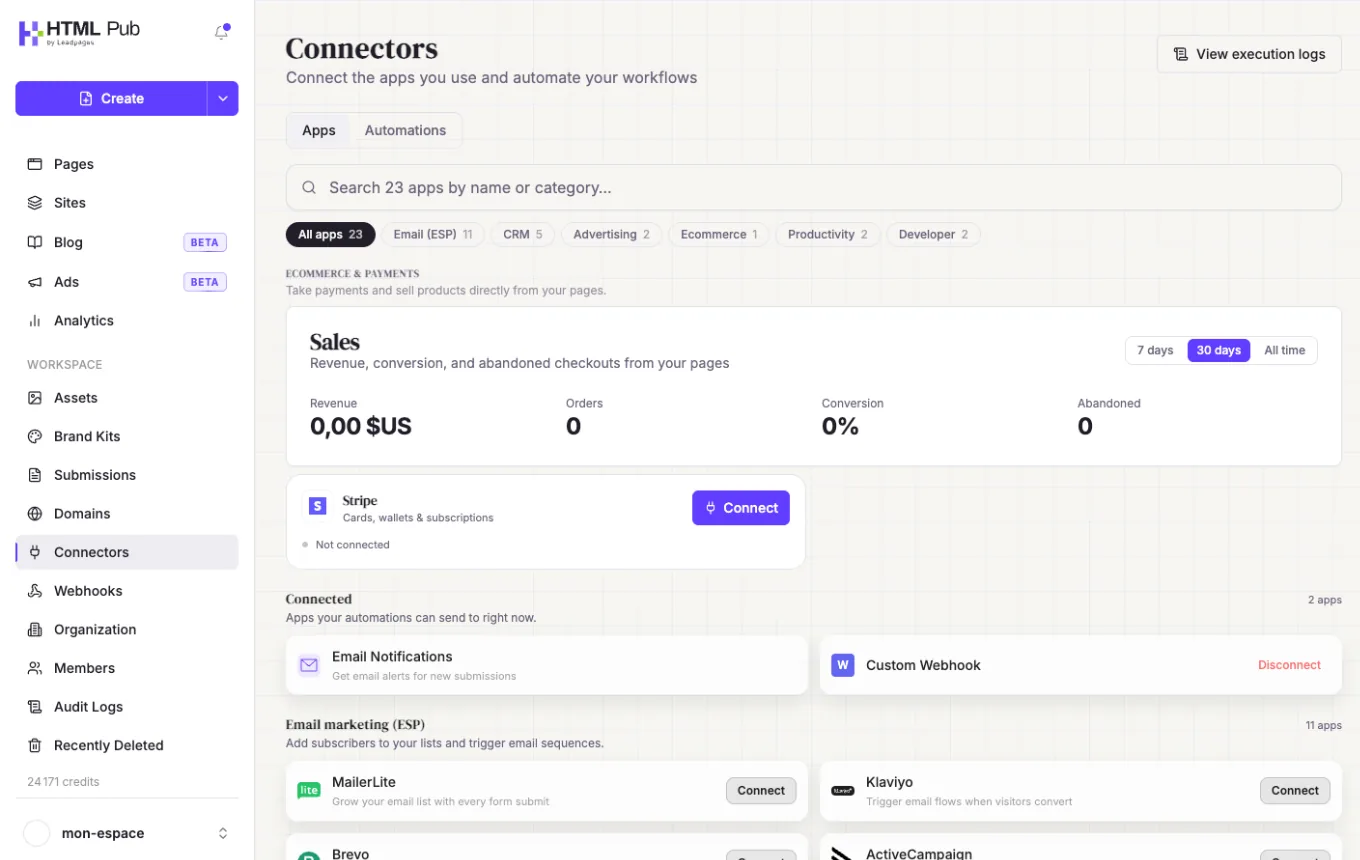
In the left menu, open « Connectors ». Find your tool (Mailchimp, Brevo, MailerLite, HubSpot…) and click « Connect ».
In the « Automations » tab, click « Create automation », choose the « Form submitted » trigger, then the tool that will receive the leads. Every new subscriber lands there automatically. Set up a welcome email there.
- 12
Run a full test yourself
Open the published page on your phone, fill in the form with your own address, then check three things.
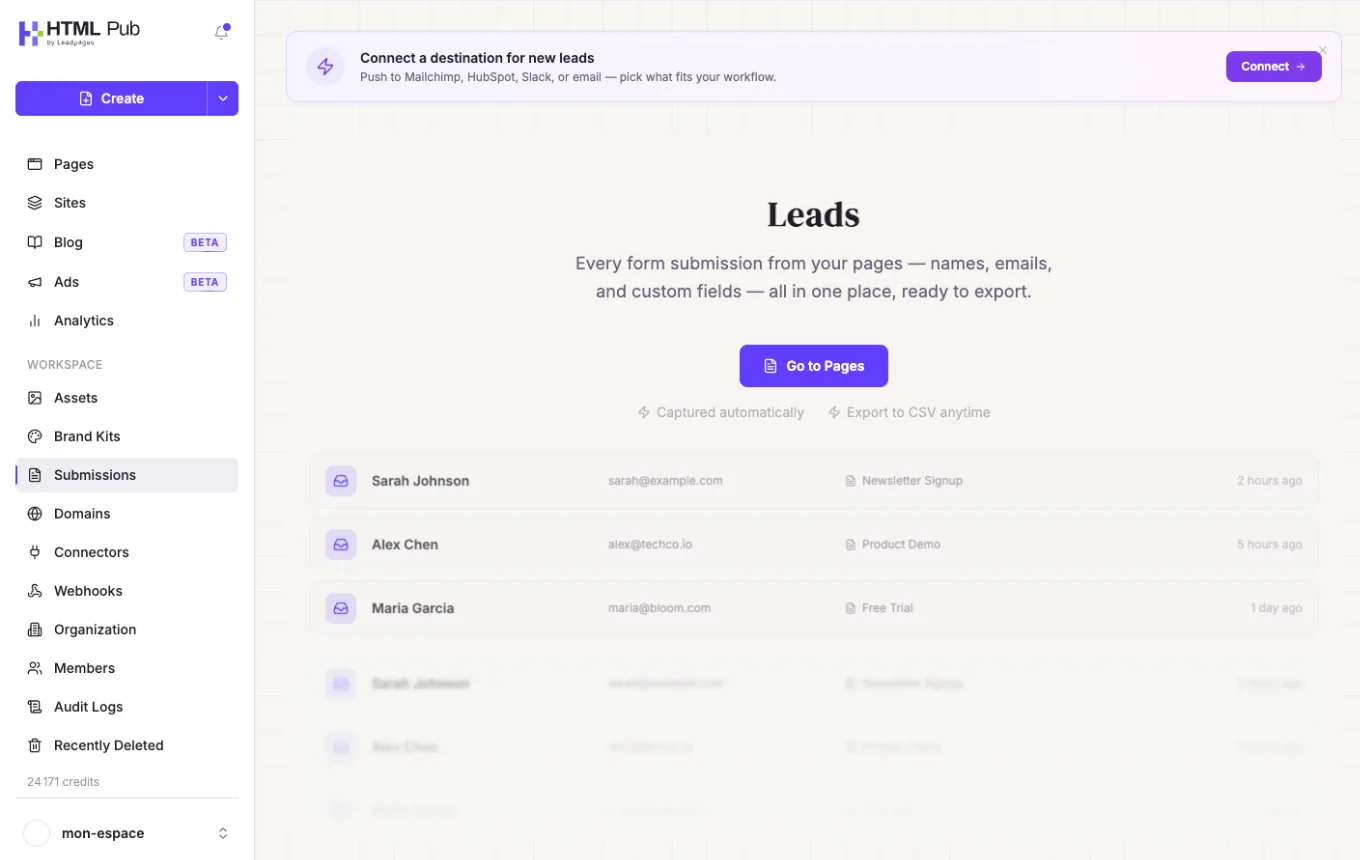
The response shows up in « Submissions », where you can also export it as CSV. The contact arrives in your email tool. The welcome email goes out. If something fails, « View execution logs » in « Connectors » shows why.
- 13
Bring in your first visitors
A live page doesn't get visits on its own. Start with people who already know you: send the link to your contacts, add it to your email signature and to your social media bios.
Then post regularly where your audience looks for ideas. On Pinterest, a vertical pin with the promised result and the page link can bring visits for months. On Instagram, LinkedIn or Facebook, a short useful tip followed by the link works better than a plain ad for your page.
To know which channel works, add a tag at the end of the link depending on where you share it, for example ?utm_source=pinterest or ?utm_source=instagram. The « Acquisition » tab in the next step will then show where your subscribers come from.
If you move to paid ads, start small, with a daily budget you can afford to lose, and only increase it once the page's conversion rate is good.
- 14
Track your results
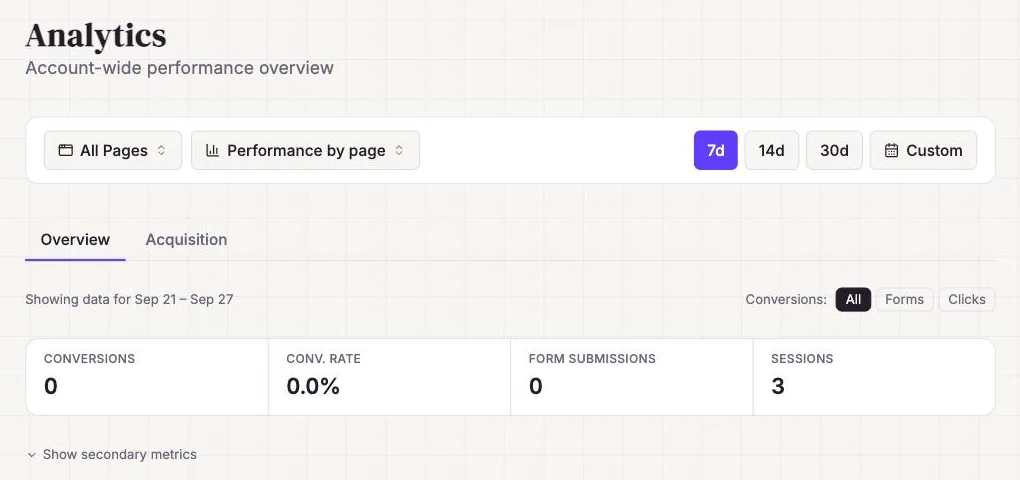
Open « Analytics ». The key numbers are at the top: « Sessions » (visits), « Form submissions », « Conversions » and « Conv. rate » (conversion rate).
Pick the period (7, 14 or 30 days) and a specific page with « All Pages ». The « Acquisition » tab shows where visitors come from. Wait for at least a hundred visits before drawing conclusions.
If lots of people come but few sign up, the problem is often the headline or the offer: the promise isn't clear or useful enough. If almost nobody comes, it's distribution that needs work: share the link in your emails, on social media, in your Instagram bio or on a Pinterest pin.
To track ads, « Scripts & Pixels », in the editor's « … » menu, lets you add the Meta or Google Ads pixel.
- 15
Improve the page with an A/B test
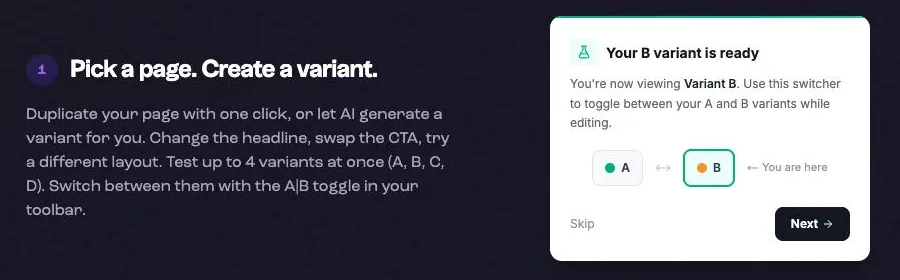
With Leadpages Grow or higher, duplicate the page to create a version B and change one thing only: the headline, the button or the offer.
Choose your goal (form submitted, click, purchase), split traffic 50/50 and wait for the « clear winner » result. Then keep the better version and start a new test. On the Optimize plan, Smart Traffic can send each visitor to the version most likely to appeal to them.
Where to start? The headline, almost always: it's what everyone reads. Then the button text, then the offer itself (a guide or a checklist, a discount or a freebie). Log each test and its result in a simple table: after a few months, you'll know exactly what your audience responds to.
On HTML Pub? You can move up to Leadpages Grow from your account settings when you're ready: your pages and domains are kept.
Try it yourself
Every HTML Pub and Leadpages plan has a 7-day free trial, with all features.
Try Leadpages for 7 days ↗Affiliate link: it does not change the price for you.
Common mistakes
- Putting several goals on the same page (sign up, buy, follow on Instagram): the visitor hesitates and does nothing.
- Leaving numbers, reviews or testimonials made up by AI on the live page.
- Publishing without testing the form yourself: you find out too late that leads weren't coming through.
- Forgetting the end of the 7-day trial and getting charged before you decided.
Official sources
Get the next guides
New Leadpages, HTML Pub and Shopify guides by email, every two weeks. No spam, unsubscribe in one click.