How to set up shipping rates on Shopify?
Shipping rates are set once, by shipping zone. Simple, fair rates keep customers from abandoning their cart at checkout.
The essentials in 30 seconds
- Open « Shipping and delivery »
- Create your shipping zones
- Add a rate to each zone
- Add conditions if needed
- Enter your usual package
- Test at checkout
Avoid: Leaving product weights at 0: weight-based rates become wrong.
See the details with screenshots ↓Step by step
Screenshots show the interface used in the original guide (Shopify in French, Leadpages in English). In your account, buttons appear in your language.
- 1
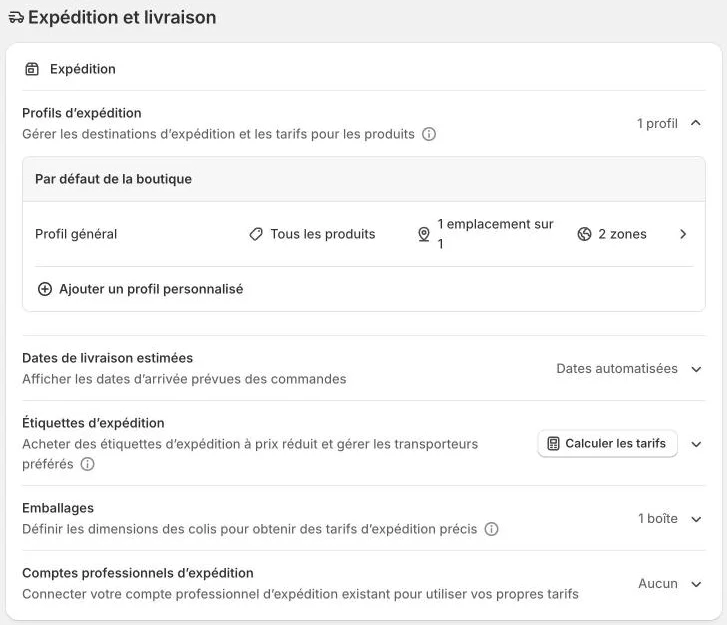
Open « Shipping and delivery »
In the admin, click « Settings » at the bottom left, then « Shipping and delivery ». The « General » shipping profile applies to all your products: that is the one you will set up.
- 2
Create your shipping zones
A zone groups the places that share the same rates. Start simple: one zone for the United States, then one for Canada or other countries if you ship abroad. A customer from a place with no zone cannot place an order.
- 3
Add a rate to each zone
In a zone, click « Add rate ». Give it a clear name the customer will see at checkout, like « Standard shipping (3 to 5 business days) », then a price. A flat rate is the easiest to understand.
- 4
Add conditions if needed
Click « Add conditions » so a rate depends on the weight of the items or the order price. Example: a « Free shipping » rate at $0, only for orders of $50 or more. That is often what makes customers add one more item to their cart.
- 5
Enter your usual package
In « Packages », enter the dimensions and weight of your most common box. With each product's weight, Shopify can then work out the real weight of each order.
- 6
Test at checkout
Place a test order with an address in each zone and look at the rates offered. Also check the free shipping threshold, just below and just above the amount.
Try it yourself
Shopify starts free, then has a discounted launch offer. You can set everything up before paying.
Try Shopify ↗Affiliate link: it does not change the price for you.
Common mistakes
- Leaving product weights at 0: weight-based rates become wrong.
- Forgetting a place where you want to sell: its customers are blocked at checkout.
- Offering too many different rates: the customer hesitates instead of paying.
Official sources
Get the next guides
New Leadpages, HTML Pub and Shopify guides by email, every two weeks. No spam, unsubscribe in one click.